Thursday, September 27, 2012

Winter is Coming....

No that the title is not in reference to the change of seasons, but rather the words of the Stark family in George R. R. Martin's Songs of Ice and Fire book series. This wonderful series was the inspiration behind the hit television program A Game of Thrones, which I got hooked on last year. It is an incredible show full of violence, intrigue, and some of that steamy stuff that HBO is known for. But the books, well that is a different matter all together. It still has all the elements that make the show rather riveting, but in far more detail, and there is also great detail in the food. A pair of fans, Chelsea Monroe-Cassel and Sariann Lehrer, noticed this and penned the wonderful, and official, Songs of Ice and Fire companion cookbook, cleverly called A Feast of Ice and Fire. It even features an introduction from George R. R. Martin himself! Talk about a seal of approval!

Having fallen in love with both screen and page versions of this incredible series, I of course had to snatch this book up when I found it at the store. Now in case you haven't noticed through my previous blogs, I love to make things from scratch and in as old fashioned a way as I can manage while still making great use of my Kitchenaid. Seriously, I would be so lost without that thing! Flipping through the pages I found recipe after recipe of mouth watering treats and savory meals. Really not the thing to do on an empty stomach. One thing I love about a lot of the recipes is that they are presented in a traditional medieval fashion, and then a more modern adaptation of the same recipe. Right away, the recipe for the honey biscuits jumped out at me and practically begged to be made. Now these are not American biscuits but British biscuits, which on this side of the pond are known as cookies. So, on a whim, I decided to make a batch of the modern honey biscuits, because they just looked too tasty to be denied!


For Modern Honey biscuits you will need:

2 cups flour
1 tablespoon baking powder
1 teaspoon baking soda
1 teaspoon salt
1 tablespoon pumpkin pie spice or mixed spice
1/2 cup granulated sugar
2 teaspoons ground ginger
1/2 cup (or one stick) unsalted butter, chilled and cubed
1/2 cup honey
1 cup raw sugar for decorating

Preheat your oven to 300 degrees and line two baking sheets with parchment paper. In the bowl of your mixer, combine the flower, baking soda, baking powder, salt, spices, granulated sugar and spices.


Run the mixer for a second to kind of get everything combined. The smell of those spices...ah heaven. And it smells so much like the change in season. Earthy ginger, nutmeg, cinnamon and allspice. Mmmm....too bad its not that chilly here! Then it would be perfect!
 
Next add in your cubed butter and blend it with the flour until it resembles fine bread crumbs.


Next, measure out the honey, and either heat it in a small saucepan on the stove over medium heat, or pop it in the microwave for 1 minute, to get the honey nice and runny, and pour it into the mixture. I found this interesting that essentially all  this is a spiced pie crust dough with honey as there is no other liquid added to these cookies, and yet they still come out soft and delicious.


Combine the ingredients until a soft dough forms. Its going to be quite sticky, but it smells amazing!


Here you are to shape the dough into little balls. To keep some semblance of uniformity, I used a cookie disher to scoop up the dough and roll it into a ball in my hands. Pour the raw sugar into a small dish, and roll the dough ball in the sugar until its coated.


Place the little balls of fragrant tastiness on the baking sheets, leaving room for them to spread. I put eight on each sheet.

 
Bake for 12-15 minutes or until the tops of the biscuits crack. Just like with snickerdoodles or chocolate crinkle cookies, the cracks mean they are done. Let them cool on the sheet for five minutes, then transfer them to cooling wracks. You can eat them warm or let them cool off a bit.
 
 
Now I will say this on these biscuits, they are very gingery. The pumpkin spice blend contains ginger, plus the two additional teaspoons the recipe calls for makes these very spicey. If you are not particularly inclined towards a lot of ginger, I recomend backing off the additional ginger by a teaspoon. But they are incredibly tasty, especially for a late evening snack with some tea or a glass of milk. And they definately bring that fall flavor to even a warm Texas evening that hasn't quite decided to show that its technically fall! Definately a repeat recipe!

Brightest Blessings!


Monday, September 24, 2012

Sissy Sunday Stewin

My eldest sister, Tara, and I have had a bit of a tradition since the ABC show Once Upon a Time premiered last fall. On Sundays, I would head over to her house and watch the show with her and the kids and we would make some kind of tasty something for dinner. This became known as "Sissy Sunday" or, taking up the childhood way of pronouncing "Once upon a time" (From stories, not the show) "Pon a pon a time" Sundays. We were such cute kids! But, cuteness of us as munchkins aside, this has become a beloved tradition for us. Of course sometimes its my mother and father over for dinner too, or our middle sister, Kelly, when she's not working somewhere in a land far, far away.

This year, however, we decided to start a week early after I got this wild idea to take a beloved family dinner favorite, Sauerbraten, and turn it into a yummy stew. Of course Tara jumped on the idea and we decided to try it out this past Sunday. Now for those of you unfamiliar with Sauerbraten, it is a German pot roast whose name literally translates to "Sour beef". Traditionally this is a boneless beef roast (usually round) that has been marinated for several days in a combination of spices (juniper, ginger, and other very aromatic spices), red wine or even cider vinegar, and buttermilk. The meat is kept in a cold place and turned once a day for sometimes up to five days, and then slow cooked in a pot with beef stock and served with spatzel or potato dumplings. A very thorough and laborious process to be sure! Our mother, when she makes sauerbraten, uses a packaged mix by Knorr and tweaks it a bit. So rather than spending days marinating, we did indeed use this short cut and instead of potato dumplings, we decided using gnocchi in the stew would give it that yummy potato-ey starch we craved.


For our stew we used:

3lbs of stew beef
Garlic infused olive oil
Three packages of Knorr Sauerbraten Mix
1 32oz carton of beef stock
1 medium onion
1 12 oz package of baby carrots
4 celery stalks
1 package of brown gravy (Not pictured because we added it in halfway through the cooking process to thicken it up a bit)
1 package of gnocchi

To begin, heat about two tablespoons of oil in a dutch oven. Add the meat and brown just enough  that it is no longer pink. Don't brown it too long or the meat will get tough.


While the meat is browning up (You may want to do it in batches, we learned that the hard way), chop the onion, carrots and celery. This is what is known as a mirepoix, and is considered the Holy Trinity of cooking, especially when it comes to stocks, stews and soups.
 
 
Aren't those colors just gorgeous together? Now we didn't chop up all the carrots, roughly about a fourth of them, keeping the rest whole to throw into the stew for some color and flavor. By now your meat should be browned nicely, and ready to be drained. Stew meat has a lot of fat, so draining is a necessary step when making a stew so you don't get that icky oily look to your liquid and its of course healthier! Drizzle a little oil back in the pan and saute your veggie trio until the onions get translucent.
 
Now its time to get everyone into the pot and down to some serious slow cooking. Return the meat to the pot, giving it all a good stir to get the meat and the veg a chance to mingle and make nice with one another.
 
 
This next step is the best way to avoid any clumping when using a powdered mix for pretty much anything you want to make. The package of Sauerbraten mix calls for water, but as we are making a stew, we used beef stock instead. Pour about two cups of stock into a measuring cup and whisk in the seasoning mix.
 
 
Add this and the remaining beef stock to the pot. Top off the pot with some hot water to ensure the meat and veggies are covered.
 
 
Give everyone a good stir, and then add in your whole baby carrots. Feel free to add some diced potatoes, pearl onions, or even some peas for color and texture. This is a stew, so veggies are welcome!
 
 
Let it come to a nice simmer, and then cover and keep on low heat. At this point, we wandered off to watch a favorite movie and chatted about this, that and the other while doing some little projects. (Tara was fighting with the Internet on how to upload some pictures from a reunion, while I knitted and tried to help. Eventually she was quite victorious over the evil technology. We all cheered).
 
 
After it had been simmering away for about an hour, I gave it a little peek and found it was not thickening up like I wanted it to. I could have of course added a roux or a slurry, but preferred mom's method for making something yummy, I added a package of brown gravy. And I say I here because I am taking full credit for the whoopsie I did. Unlike when we mixed the broth and the seasoning mix, I just dumped the packet in. This led to clumps of gravy gunk floating around in the stew. But I fished it all out with some of the broth and whisked it all together until it all dissolved and poured it back in. We can just pretend that didn't happen, right? Right.
 
 
After my shameful, clumpy gravy mishap, I wandered back to the movie, chatting and knitting while we let the stew simmer for another two or so hours. Once we felt we were hungry, and taste testing the meat for tenderness (ooooh so yummy and falling apart), we added the gnocchi. Usually with this potato based pasta, you wait until it floats to the top and know its done. With all that meaty, veggie goodness going on in that pot, there was no way those suckers were gonna float. So we just let them hang out for about five minutes.
 
 
That is the hand of Faith (No not Fate, Faith!) helping us out in the kitchen so I could take a picture. She's a great gnocchi plopper. Once the gnocchi were tender, it was time to eat. We paired this with some store bought German bread (I know shocking, we didn't make bread!) and sat down for a warm, filling, need to take a nap when you are done meal!


I love cooking with my sister, we have so much fun! And so, we decided that every Monday (Unless something happens) The Texas Domestic Goddess blog will feature the recipe we have tried the previous Sunday. So be on the look out for more Sissy Sunday fun!
 
Brightest Blessings!


Thursday, September 20, 2012

Its Cold and Flu Season!

Nothing is worse than waking up in the morning with that horrid ache in your throat and that pressure in your nose and head. You *SNIIIIF* try and *SNIIIIF* and try to breathe but...*SNIIIIF!* all you do is give your nose a good work out. You swallow and it feels like you ate cactus needles at some point, and your head feels like a bunch of little evil faeries were playing kickball with various parts of your brain. Its worse when you have nausea on top of it and the chills of a fever. For years, honey and lemon have been the old standbys for that horrid chill and ache that seems to creep along the populace during the early Fall and Winter months. Ginger ale, due to the ginger of course, is Mom's best remedy for a troubled tummy. Wouldn't it be wonderful to have all that in one place and then add it to something warm to fight that chill? A perfect mug of comforting, soothing warmth.

Look no further! Recently I came across a recipe for honey-lemon marmalade and all I could think of was this interesting citrus concoction my sister used to get from our local Asian market. She would add it to her tea, especially when she had a cold, and often told me how wonderful it was. So as I was contemplating the possibilities of this particular marmalade, I thought of how soothing it would be on its own, in just a cup of hot water. But it was missing something crucial to be my ideal, natural, home remedy for the ickies. Ginger! (Seems I want to add that to just about anything huh? I have an over abundance at present, so sue me!) Yes, ginger would be just the thing to take this from a great sore throat, cough and fever chills soother to a tummy tamer too! So I got to work and tweaked the recipe and came up with this wonderful concoction of my own!

You will need:

14-16 lemons (Depending on the size you can find)
3 small hands of ginger
2 cups of honey (Always try to get local if you can)
4 cups of sugar
1 1/2 cups water
2 pouches of liquid pectin


The first thing you want to do is of course, get your jars clean and in water to boil for sterilization. Or you can just run them through the dishwasher and leave them in there on the drying cycle until ready to use. Fill your boiling water canner with water and get the water heating, caps in a saucepan of water that has been boiled and then the burner turned off, and your tools in some boiling water to sterilize, or in the dishwasher with the jars! (Two birds with one stone!)
Now I have made this before and as my dear friend Danyale will tell you, chopping lemons is a pain in the eye. Yes I said eye! Because those suckers will squirt and aim straight for your baby blues!! (Or green or brown or hazel, whatever color your eyes are) So we used my old beat up food processor. That was a mess! Juice everywhere! So I had to purchase a new one and I went for high quality instead of a Black Friday deal this time. Not only am I making some yummy marmalade, I'm test running my new toy! And it worked great! Easiest way to do this is to cut the lemons in half, and then quarter the halves so that they are small enough to get broken up by the blades of the food processor.


Pulse the lemons in the food processor until the they are nicely chopped up. Add them to an non reactive pot.


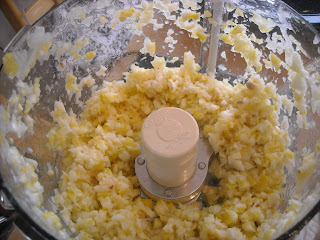
Next, cut up the ginger into chunks, and pulse in the food processor until well chopped. This is a fibrous root so the chopped up bits are going to look rather like a cross between a puree and soggy wood shavings. But it will smell wonderful!!


Add the ginger to the lemon in the pot and place on the stove.


Now time to add the water, honey, and sugar. A trick to keeping the honey from sticking to your measuring cup is to spray the cup with non-stick cooking spray. It will flow beautifully out of the cup and into whatever it is your making if you follow this step.


Bring this to a boil and then let it simmer for 30 minutes. This is an incredibly fragrant marmalade and it will have your house smelling so good! Give it a few stirs just to ensure even cooking while its bubbling away. This is a great time to do up your dishes! Or in my case, do a touch of schoolwork!


After the thirty minutes has passed, add in the two pouches of pectin and boil gently (Not a full on roiling boil) for five minutes.


Now, using your sterilized jars and tools, ladle the hot marmalade into jars leaving 1/4 inch of head space, make sure to wipe the rims of the jar with a clean cloth or paper towel. Cap and screw on the bands, processing in a boiling water canner for 10 minutes.


Once ten minutes is up, pull out your jars and set them to cool in a draft free area on wracks or towels. Anything with liquid pectin should sit undisturbed for about 24 hours to give the pectin a chance to work its magic. But here is my favorite part! *PING!* I love the sound of a jar sealing! Music to my ears! This recipe makes about 11- 12 half pint jars, so there is plenty to hold you for the Winter months as well as to share with friends and family, if you can bring yourself to share it that is! Its just as tasty as it is comforting! Hopefully this recipe will serve you well on one of those cold, miserable days where you feel just like the weather looks...ICKY!

Brightest Blessings!


Monday, September 10, 2012

What to do with the Ginger?

I know its been a while, but sadly I was a touch under the weather! Thankfully I'm doing much better now. Well at least I'm not in a ton of pain like I had been! Yay for mom's who stop in with medicine and chocolate! Speaking of chocolate, the other day I had a mad hankering for some scratch made brownies. I also had a bunch of pulverized ginger that had been used to make syrup. This ginger is what was left after simmering chopped ginger in equal parts water and sugar with a generous couple of squirts of Agave for an hour, then left to steep for an hour. The liquid you strain off is an excellent ginger syrup for making your own ginger ale. I didn't have the heart to throw out all that gingery goodness! So I popped it in my bullet blender and made it into a kind of chunky ginger pulp. So a thought occurred to me. Why not make ginger brownies!? So I meandered on over to my crazily overstocked pantry and began pulling out all manner of ingredients,  including some chopped hazelnuts I had stashed away for Lebkuchen season. Whats a good brownie without some nuts? So by the time I had the counter piled with ingredients, I had decided on a ginger, hazelnut brownie using Ghiradelli sweet ground chocolate, which is a kind of dutched cocoa. I used the main recipe on the canister itself but with some tasty modifications! I also wanted to make use of my 'As Seen on TV' perfect brownie pan. I was curious as to how perfect it was. I just love those 'As Seen on TV' products. However did we make it through life without them? (I am joking of course.)...(Sorta).

For these fabulous, sock you in the mouth brownies you will need:

1 stick of unsalted butter
2 eggs
3/4 cup of sugar
1 teaspoon vanilla
3/4 a cup Ghiradelli sweet ground chocolate
2/3 cup of flour
1/4 teaspoon baking powder
1/4 teaspoon salt
1 small package chopped hazelnuts
4 tablespoons pureed ginger used to make ginger syrup


First things first, preheat your oven to 350 degrees and spray down your baking pan or dish with non-stick cooking spray.Since I'm using a perfect brownie pan, I'm spraying down the pan and the dividers.


In the bowl of your mixer, cream together the sugar and butter.


Once you have a creamy buttery sugary substance in your mixing bowl, add the vanilla and the eggs one at a time, letting each one get mixed in before adding the next. I use bourbon vanilla. Seriously try it if you can find it! It will change your culinary life!


Now here is where my measuring is a bit weird. I know I put four tablespoons in the recipe, that's really just an educated guess. Honestly I didn't know the appropriate phrasing for "Two huge glopping soup spoonfuls" of pulverized ginger. So you know...use my insane method of measuring or conventional measuring spoons to add your ginger to the goop in the bowl. I also added the salt and baking powder at this point.


Now all that is left is to add in the flour and the cocoa. Let these all blend together fairly well before at the last possible moment adding the nuts. You just want those stirred in a bit.


Okay..I admit it. Its very obvious that picture of flour is not quite right. Truth is I forgot to take a picture of that step so I tossed in one from another recipe. Bad Brandi! But you get the idea right? So now you have this wonderful smelling chocolate goo in your mixing bowl, all you have to do is schmear that into your baking dish, and pop that in the oven for about 25 minutes.


Let these babies cool and enjoy! Now I will warn you, these suckers bite back! Fresh ginger has a bit of a bite to it, almost akin to something spicy, but without the burn. The chocolate helps mellow that out a bit. Also, because its fresh ginger, it gives a rather interesting, almost Earthy texture to these sweet treats. These were darn tasty, if I do say so myself, and I made use of something that would otherwise have gone to waste! Goes to show you can make use of almost anything to create a tasty treat!
 
Brightest Blessings!